Kamis, 30 Januari 2014

Popular Post Widget into Automated Post Slider

Convert your popular post widget into automated post slider with flexible and stylish design using some Blogger tricks. 


Step 1:
First Add Default Popular Post Widget in your Blogger Layout.
Go to Blogger ---> Layout ---> Click Add a Gadget ---> then Add "Popular Post Widget".(If you already added this widget on your Blogger then skip this step)
Step 2:
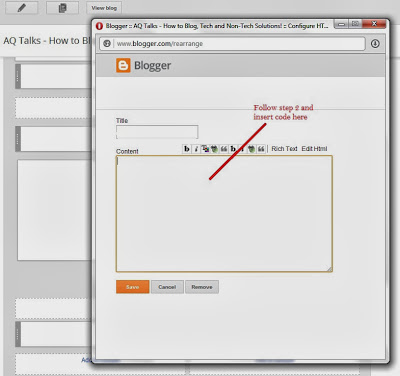
Add a "HTML/JavaScript" widget in your Blogger layout and insert below code inside "HTML/JavaScript" widget.
 
 
<style type="text/css" media="screen">
<!--
#PopularPosts1{
height:263px;
}
.item-content {
height:263px;
position:relative;
width:560px;
}
.slider {
height:263px;
margin-left:25px;
width:560px;
overflow:hidden;
margin-top:5px;
padding:0px 0px;
height:263px;
}
.item-snippet {
background:transparent url(http://i195.photobucket.com/albums/z105/dantearaujo/darkbg.png) repeat scroll 0 0;
color:#FFFFFF;
padding:5px 5px 10px 5px;
position:absolute;
bottom:0;
text-align:left;
width:560px;
font-size:9px;
font-style:italic;
}
.item-title{
color:#FFFFFF;
font-size:10px;
font-weight:bold;
font-style:normal;
margin-bottom:5px;
}
.item-title a:link,.item-title a:visited{
color:#FFFFFF;
text-decoration:none;
border:none !important;
padding:0 !important;
}
.item-thumbnail img{
padding:0 !important;
}
.item-thumbnail a{
padding:0 !important;
}
.crosscol .widget-content {position:relative;}
.slider ul, .slider li,
#slider2 ul, #slider2 li{
margin:0;
padding:0;
list-style:none;
}
#slider2{margin-top:1em;}
.slider li, #slider2 li{
width:560px;
height:263px;
overflow:hidden;
}
.item-thumbnail img{width:560px;height:263px}
#prevBtn, #nextBtn,
#slider1next, #slider1prev{
display:block;
width:30px;
height:77px;
position:absolute;
left:-30px;
text-indent:-9999px;
top:71px;
z-index:1000;
}
#nextBtn, #slider1next{
left:582px !important;
}
#prevBtn, #nextBtn, #slider1next, #slider1prev {
display:block;
height:77px;
left:0;
position:absolute;
top:100px;
width:30px;
z-index:1000;
}
#prevBtn a, #nextBtn a,
#slider1next a, #slider1prev a{
display:block;
position:relative;
width:30px;
height:77px;
background:url(http://i195.photobucket.com/albums/z105/dantearaujo/prev.png) no-repeat 0 0;
}
#nextBtn a, #slider1next a{
background:url(http://i195.photobucket.com/albums/z105/dantearaujo/next.png) no-repeat 0 0;
}
ol#controls{
margin:1em 0;
padding:0;
height:28px;
}
ol#controls li{
margin:0 10px 0 0;
padding:0;
float:left;
list-style:none;
height:28px;
line-height:28px;
}
ol#controls li a{
float:left;
height:28px;
line-height:28px;
border:1px solid #ccc;
background:#DAF3F8;
color:#555;
padding:0 10px;
text-decoration:none;
}
ol#controls li.current a{
background:#5DC9E1;
color:#fff;
}
ol#controls li a:focus, #prevBtn a:focus, #nextBtn a:focus{outline:none;}
.test{
margin:30px;
}


-->
</style>
<script src='http://ajax.googleapis.com/ajax/libs/jquery/1.6.1/jquery.min.js' type='text/javascript'></script>
<script src='http://accordion-for-blogger.googlecode.com/svn/trunk/easysliderpopular.js' type='text/javascript'></script>
 
 
Refer Screen-shot:
Arrange your "HTML/JavaScript" widget and "Popular Post" widget as mentioned in below scree-shot.
Result:
You'r Done!

Recent Posts Widget with Thumbnails

A few days ago, I posted a tutorial on How to Add a Simple Recent Posts Widget that shows a list with the most recent posts if you would prefer a more minimalist look. In this post, you will see a different way of displaying the Recent Posts on Blogger - this is specially for those who want to show more info like the recent posts excerpt / summary and the posts thumbnails.

To add this gadget is very simple, just follow these steps below:


recent posts, blogger widgets

How to Add the Recent Posts Widget to Blogger


Step 1. From your Blogger Dashboard, go to Layout > click on Add a Gadget link


Step 2. From the pop-up window, scroll down and choose HTML/JavaScript


Step 3. Inside the empty box, add the following code:
<div class="eggTray">
<script src="http://helplogger.googlecode.com/svn/trunk/listbadge.js">{"pipe_id":"1a6640e2a78b2c6e736f2220529daae5","_btype":"list",
"pipe_params":{"URL":"YOUR-BLOG/feeds/posts/default"},
"hideHeader":"false","height":"500","count": 8 }</script>
<div style="font-family: arial, sans-serif; font-size: 9px;" class="ycdr"><a href="http://helplogger.blogspot.com/2012/05/recent-posts-widget-with-thumbnails-for.html" target="_blank" title="Grab this widget">Recent Posts Thumbnails</a> <a href="http://helplogger.blogspot.com/" target="_blank">Blogger Widget</a></div><noscript>Your browser does not support JavaScript!</noscript></div>
<style type=text/css>
.eggTray {margin:10px 0px;padding:0px;}
.ybr li  {border-bottom:0px #cccccc dotted; padding:0px 0px 10px 0px!important;}
.pipesTitle {padding-top:0px;}
.pipesDescription {display:true;}
.ycdr {background:transparent url(https://blogger.googleusercontent.com/img/b/R29vZ2xl/AVvXsEj0QCahcziBgslrxLbWEQiBy2u2__ZjHtKqb9kPHceOcPQUp1x9-CrDFJyhaVzA5CIYgTiTv0msGkgXwA1JoEykMuZHjMSd51y-aTEEQE5mZhyphenhyphen7IZE78tRtLwE-LoFPuL_tADAgxMaZ7IQ/s1600/logo.png) 0px 0px no-repeat; padding: 1px 0px 0px 19px; height:14px; margin: 4px 0px 0px 0px;line-height:14px;}
.ycdr, .ycdr a {color:#999999;}
.widget .popular-posts ul {padding-left:0;}
</style>
Step 4. Replace YOUR-BLOG with the url of your site/blog (ex: http://helplogger.blogspot.com) and pay attention to have no forward slash symbol "/" at the end of your url, otherwise it won't function properly.
  • To disable the scroll bar, remove the number 500
  • By default, this widget is set to display a maximum of 8 recent posts. To change this number, replace the number 8 with the number of posts desired
  • if you want only the posts titles to appear, change true to none and "0" from padding-top:0px with 10
Step 5. Save your widget. And you're done!

Horizontal Popular Post Widget using CSS


'Recent Posts' widget or 'Popular Posts' widget is very essential widget (or gadget) for blogger blog. This widget displays your blog popular posts based upon some analytic result along with snippet, images etc which are also optional. By default blogger provides some styles for this widget but somehow these are obsolete and unprofessional. I have written quite a few posts about customization of this widget. This post is also one of those customization but a little different. Here i shall show you how to display popular posts or recent posts in horizontal manner instead of vertical. The main and only problem is that it requires larger horizontal space i.e. larger width of of your blog. So before you proceed, make sure you have enough room in your blog to display posts horizontally.

    Features :
  • Full control over 'Image thumbnail' view.
  • Full control over 'Snippet' view.
  • If you have checked 'Show image thumbnail' but unfortunately your blog post contains no image, then image thumbnail will be automatically filled by a preassigned image (no-image) as shown in the figure.
Screenshots :
All right, let's proceed.
Before you make any changes in your blogger template, it is recommended to backup your blog in case something goes wrong.
It is just a cautionary statement. Don’t get scared. Just stay serious.
Let's proceed.
  1. Sign in to Blogger.
  2. Click the Drop-down arrow adjacent to 'Go to post list' icon.
  3. Click 'Layout' form the drop-down menu list. It will take you to the layout section of different widgets (or gadgets) of your blog.
  4. Click 'Add a Gadget' link as shown in the fig below. A new window will open that contains list of all gadgets available.
  5. Scroll down and when you see 'Popular Posts' gadget, click on it or click the '+' icon as shown in fig below.
  6. This will take you to a new window named as 'Configure Popular Posts'.
    • Select the 'Most viewed' option to 'All time' .
    • Select number of the post(s) in 'Display up to' section.
    • Check 'image thumbnail' if you want to show it, otherwise leave it as unchecked.
    • Check 'snippet' if you want to show some post texts along with its title.


  7. Hit 'Save'
  8. If your blog already contains this widget, you don't need to repeat the part that has been discussed so far.
  9. Click 'Template'
  10. Click 'Edit HTML'.
  11. Make sure that 'Expand Widget Templates' is checked. If you are using new interface of blogger, you don't have to do this part. 'Expand Widget Template' is checked by default in blogger new user interface.
  12. Search for (
    Ctrl
    +
    f
    ) </b:skin and paste these codes before </b:skin
  13. /*--Horizontal Popular Post using CSS by Bloganalyzer --*/
    
    .PopularPosts li{
    display: inline;
    list-style: none;
    width: 200px;
    height: 150px;
    float: left;
    text-align: justify;
    background: #e4e4e4;
    border: 1px solid #333333;
    color: #11111;
    margin: 5px;
    padding: 5px;
    line-height: 1.2em;
    }
    .PopularPosts .item-title{
    text-align: left;
    width: 200px;
    font-size: 20px;
    background: #afafaf;
    padding: 5px;
    border-bottom: 1px solid #868686;
    border-right: 1px solid #868686;
    margin-bottom: 5px;
    }
    .item-thumbnail img{
    height: 80px;
    width: 80px;
    }
    
  14. Click on 'Jump to widget', select 'PopularPosts1' from the drop down menu (if you are using blogger new interface) and find 'Show snippets and thumbnails'. You can also search for 'Show snippets and thumbnails' (applicable for both new and old interface)
  15. You will find a code something like that
  16. <!-- (4) Show snippets and thumbnails -->
      <div class='item-content'>
        <b:if cond='data:post.thumbnail'>
          <div class='item-thumbnail'>
            <a expr:href='data:post.href' target='_blank'>
              <img alt='' border='0' expr:height='data:thumbnailSize' expr:src='data:post.thumbnail' expr:width='data:thumbnailSize'/>
            </a>
          </div>
        </b:if>
        <div class='item-title'><a expr:href='data:post.href'><data:post.title/></a></div>
        <div class='item-snippet'><data:post.snippet/></div>
      </div>
    
  17. Replace that code with this code. I should remind you to backup your template before any further movement.
  18. <!-- (4) Show snippets and thumbnails -->
      <div class='item-content'>
        <div class='item-title'><a expr:href='data:post.href'><data:post.title/></a></div>
        <b:if cond='data:post.thumbnail'>
          <div class='item-thumbnail'>
            <a expr:href='data:post.href' target='_blank'>
              <img alt='' border='0' expr:height='data:thumbnailSize' expr:src='data:post.thumbnail' expr:width='data:thumbnailSize'/>
            </a>
          </div>
        <b:else/>
          <div class='item-thumbnail'>
            <img src='https://blogger.googleusercontent.com/img/b/R29vZ2xl/AVvXsEgK9L8P0WXpwjmObAUJU3ijNEXfhxUA9ysrGO9GyLnD85a5Zmn8UmoDPtqM1u4ce2CLwVo_KQb-_jZhFIYRAJnmniUs4ST9gTgSa6v3bUO1fFskhPjKfHpqFQBX7IN-8tgiZsyw_mE0gHs/s400/noimage.png'/>
          </div>
        </b:if>
        <div class='item-snippet'><data:post.snippet/></div>
      </div>
    
  19. Hit 'Save template'
If you have any questions on this, please let me know. Enjoy !

How to add a thumbnail image/photo gallery

For those who would like to show pictures in an image gallery, here's a gallery made with JavaScript and CSS that includes some thumbnails with which you will be able to pick different images on mouse click.

With the help of CSS, we can then place the <img> element to make it appear at the same position for each thumb and we'll be able to style the thumbnails as small blocks with a defined height/width. The script will add a click-event for each <li> object that changes it's child's <img> visibility and assigns an "active" class name to the <li>.


How to Add Image Gallery with Thumbnails to Blogger


Step 1. Log in to your Blogger dashboard, go to Template > Edit HTML


Step 2. Click anywhere inside the code area and press the CTRL + F keys to open the Blogger search box

Step 3. Inside the search box type </head> and hit enter to find it.

Step 4. Now pick one of the styles below that you like the most, then copy the code associated with it:

Style 1
<style type='text/css'>
#image-gallery {display: none;}
  #jquery-gallery {padding:0;margin:0;list-style: none; width: 500px;}
  #jquery-gallery li {width:84px; height: 80px;background-size: 100%;-webkit-background-size: cover;-moz-background-size: cover; -o-background-size: cover;background-size: cover;margin-right: 10px; border: 3px solid #fff; outline: 1px solid #E3E3E3; margin-bottom: 10px;opacity: .5; filter:alpha(opacity=50); float: left; display: block; }
#jquery-gallery li img { position: absolute; top: 100px; left: 0px; display: none;}
  #jquery-gallery li.active img { display: block; border: 3px solid #fff; outline: 1px solid #E3E3E3; width:490px; max-height: 375px;}
  #jquery-gallery li.active, #jquery-gallery li:hover { outline-color: #DFDFDF; opacity: .99;filter:alpha(opacity=99);}
</style>

Style 2
<style type='text/css'>
#image-gallery { display: none; }
#jquery-gallery {padding:0;margin:0;list-style: none; width: 200px; }
#jquery-gallery li {background-size: 100%;-webkit-background-size: cover;-moz-background-size: cover; -o-background-size: cover;background-size: cover;margin-right: 10px; width: 80px; height: 80px; border: 3px solid #fff; outline: 1px solid #ddd; margin-right: 10px; margin-bottom: 10px; opacity: .5;filter:alpha(opacity=50); float: left; display: block; }
#jquery-gallery li img { position: absolute; top: 0px; left: 200px; display: none; }
#jquery-gallery li.active img { display: block; width:370px; border: 3px solid #fff; outline: 1px solid #E3E3E3; }
#jquery-gallery li.active, #jquery-gallery li:hover { outline-color: #bbb; opacity: .99;filter:alpha(opacity=99);}
</style>
Note: The display: none; of the first ID (#image-gallery) is to prevent images appear with their actual size before they go inside the gallery container, this is while loading the code. In #jquery-gallery we have the width of the container for the thumbnails (200px), so that they display in two rows and for this we need to count the width of the thumbnail (80px) plus the margins between them. The left declaration of #jquery-gallery li img is to move the larger thumbnail that shows on mouse click so that it won't overlap with the smaller thumbnails.
Step 5. Paste the code that you copied earlier just above the </head> tag.

Step 6. Just above the same </head> tag, add this script:
<script type='text/javascript'>
//<![CDATA[
var gal = {
init : function() {
if (!document.getElementById || !document.createElement || !document.appendChild) return false;
if (document.getElementById('image-gallery')) document.getElementById('image-gallery').id = 'jquery-gallery';
var li = document.getElementById('jquery-gallery').getElementsByTagName('li');
li[0].className = 'active';
for (i=0; i<li.length; i++) {
li[i].style.backgroundImage = 'url(' + li[i].getElementsByTagName('img')[0].src + ')';
li[i].title = li[i].getElementsByTagName('img')[0].alt;
gal.addEvent(li[i],'click',function() {
var im = document.getElementById('jquery-gallery').getElementsByTagName('li');
for (j=0; j<im.length; j++) {
im[j].className = '';
}
this.className = 'active';
});
}
},
addEvent : function(obj, type, fn) {
if (obj.addEventListener) {
obj.addEventListener(type, fn, false);
}
else if (obj.attachEvent) {
obj["e"+type+fn] = fn;
obj[type+fn] = function() { obj["e"+type+fn]( window.event ); }
obj.attachEvent("on"+type, obj[type+fn]);
}
}
}
gal.addEvent(window,'load', function() {
gal.init();
});
//]]>
</script>
Basically what this script does is to look if there is any ID named "image-gallery" and get the different list items that may exist within it. These elements will be displayed as thumbnails and a function will decide what to do when they are clicked. So, each time we click on a thumbnail, the "active" class will be assigned and the thumbnail should be visible in a larger container.

Step 7. Save the changes by clicking on the Save template button.

And finally, here's the HTML code. This is a normal list with the image-gallery ID, enclosed within a DIV with a relative position to avoid side effects of other pre-existing positions.

Step 8. Paste the below HTML to where you want to display the gallery by going either to Layout and adding a new gadget (click on the Add a gadget link and choose HTML/JavaScript), or inside a post or page within the HTML section.
<div style="position:relative;">
<ul id="image-gallery">
<li><img src="IMAGE-URL1" /></li>
<li><img src="IMAGE-URL2" /></li>
<li><img src="IMAGE-URL3" /></li>
<li><img src="IMAGE-URL4" /></li>
<li><img src="IMAGE-URL5" /></li>
</ul>
</div>
Note: if elements on your page overlap with this gallery, you might need to add the height declaration after the position: relative; The value of height depends on the size of your gallery.

Example:
<div style="position:relative; height: 500px;"> 
Change IMAGE-URL1 with the image URL. If you don't know how to get the address of an image, see this
In case you need to add links to your images, add this HTML structure instead:
<div style="position:relative;">
<ul id="image-gallery">
<li><a href="page-URL"><img src="IMAGE-URL1" /></a></li>
<li><a href="page-URL"><img src="IMAGE-URL2" /></a></li>
<li><a href="page-URL"><img src="IMAGE-URL3" /></a></li>
<li><a href="page-URL"><img src="IMAGE-URL4" /></a></li>
<li><a href="page-URL"><img src="IMAGE-URL5" /></a></li>
</ul>
</div>
Again, here you need to replace the page-URL text with the URL of your page/post.

Save your widget or page and you're done!